 A while ago I promised a tutorial for portfolio cases. As I was writing it up, I found (via Craft Gossip) a beautifully put-together tutorial for a much more professional portfolio case. My first thought was "No! I'm doing that!" I still wanted to put mine up, but didn't want to seem to be copying. I mailed Kimberly of Niesz Vintage, and she agreed that great minds think alike.
All of which allows me to link neatly to this great post about originality, copying, and influences. Read it and read all the comments too - really interesting.
And here goes with my tutorial:
 Cut 3 pieces of fabric: an outer, a lining, and a piece for an inner pocket. For an A5 folder, cut an outer 46cm x 17cm, a lining 22cm x 17cm, and a pocket 17cm high x whatever you have. For an A4 sketchbook folder, cut an outer 117cm x 23cm, a lining 62cm x 23cm, and a pocket 23cm high. (Seam allowances of 1cm are included in these measurements.)
Hem the short ends of the outer and the lining, and the side of the pocket that will be open, by turning under 1cm and stitching.
Mark the middle of the outer piece, and fold the ends towards the middle, with the right side of the fabric on the outside.
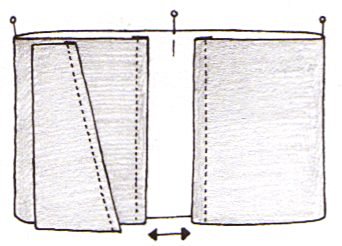
Leave a gap between the hemmed ends - 2cm for the A5 folder, 10cm for the A4 sketchbook. Mark the folds. Decide how close to the fold the pocket will be; flip the pocket piece so the wrong side faces you, and stitch it to the cover.

Flip it back over, and press the seam. Sew a button on the outside of the cover.
 Fold the long piece again so that the right side of the fabric faces in. Place the lining piece on top, and stitch along the top and bottom.
 Clip the corners.
 Turn everything right side out (turn so the top and bottom seams are hidden, then turn the pockets, using a knitting needle to get the corners turned completely). Cut bits of card for the pockets and slip them in.
 Tie one end of a piece of ribbon or cord around the button, close the folder, wrap the ribbon round to measure how long it needs to be, and cut. The ribbon should wrap 2 or 3 times round the button to be secure.
 The sketchbook pocket.
 Finished folders.
18 comments:
I love them, yes I do...
The fabric....Oh My....I love it
Yours are much pretty then mine!!!!!!!
I condemn you to ..... perfection
:)
i love then too! off to read the links
Very nice!!!!
Your tuts are works of art all by themselves! I love the idea of including the pocket!
It has been a while since I visited your blog, and I must say I quite like the new layout and your website. It looks very professional and neat and I thimk your work gained in unity.
Plus your tutos are great!
Great tutorial, Jesse!
I love the button and ribbon closure.
Thank you so much for the mention and for the link to the interesting article...so true! :-)
Kimberly
Hi Jesse! What a great tutorial. I have never done a project like this before although I have always wanted to cover one of my books. I need to put this on my "To Do" list, which is miles long and changes every day! Hope you have a great weekend!
These are such lovely little portfolios!! One thing I love about all of the sewing ideas out on the Internet is the way that ideas spawn ideas, and inspiration moves from individual to community and back again. Each iteration is has its own personality and its own take on design.
I linked to your tutorial on Craft Gossip Sewing:
http://sewing.craftgossip.com/tutorial-make-a-fabric-portfolio-to-hold-your-journal/2010/04/16/
--Anne
Love these! Great fabric! I'll be linking this in my weekly roundup on Saturday. Have a great day!
Joanne @ Ready, Set, Craft!
readysetcraft.blogspot.com
You're right, that's a fascinating post about originality and copying - thanks for pointing it out.
oooh! weekend project!
Very pretty and practical. Love 'em!
Thanks for the tutorial.
I'm so glad you wrote this up, it's fantastic! I'll be linking to this.
great! thank you. it's so simple and elegant. I loved how clear it is.
Hi, Jesse. I live just outside Durban. It's nice to meet another South African on the creative web. I like your idea. Talking about synchronicity, I made a cover similar to this about 10 years ago to cover a box file, also with pockets for pens, etc. so, yes, the ideas do go round and round.
I love this tutorial! I especially love the way you drew up your pieces. Just fabulous to see hand work in this age of autocad. I appreciated it so much, I shared linked you as part of my celebration of inspiration this May. Check it out here: http://stresstheseams.blogspot.com/2010/05/may-you-be-inspired-days-fabric.html.
While you are at it, you can sign up for my giveway!
Cheers!
Ditto all the complements! Great tutorial and I was caught by the hand-drawings. Loved it!
lolzz awesome design and great idea, I just saw fabric folder first time ;) its really attractive....
Post a Comment