Showing posts with label tutorials. Show all posts

Tuesday, 12 May 2015

Basics: Making Purses/Bags/Bins

These are all made pretty much the same way; once you've made one, you'll be able to adapt the template to suit whatever you need.

The basic shape is this:


Lengths a and b can be whatever you want, but it's important that the x lengths are the same.  a is the length of the bag, b is the height, and x is half the width.  Include seam allowances in all these measurements (yellow lines on the drawing). You'll need to cut 2 pieces of outer fabric, and 2 pieces of lining fabric.

To speed things up (minimally) you can eliminate the bottom seam on the outer fabric, and cut the outer piece like this:


If you do this, it's important to note that you won't need to include the seam allowance at the bottom of the purse - no seam, no seam allowance! So n is the finished width of the bag, without seams (for eg 5cm) and m is half of that, plus seam allowance (for eg 2,5cm + 1cm seam allowance). If you're not sure, cut the pattern out in paper first and fold the edges to make sure they line up properly.


Sew the zip to one side of the outer fabric, right sides together.


Sew the zip to the other side of the outer fabric, right sides together.


Now sew the lining pieces to the zip, sandwiching the edges of the zip between the 2 layers of fabric.


Open the zip halfway, fold the purse flat with the right sides of the fabric on the inside, and sew along the red lines. Leave a gap at the bottom of the lining section. Go very very slowly over the zip section; make sure both ends of the zip are folded the same way.

(If you've cut the outer fabric in 2 pieces, not 1, sew the bottom seam as well.)

There's some debate over which way the teeth of the zip should be facing - into the lining or not. I've tried both, and honestly found no difference.


Now fold the corners flat, and sew across.

Turn the purse right side out through the gap in the lining, and sew the gap shut, either by hand, or by folding the seam allowance inward and sewing a seam very close to the edge.


This pattern will give you a purse with slanted sides. For a straight-sided purse, you'll need to adjust the sides of the pattern:


To make a simple tote bag, without a lining, simply cut 2 outer pieces, finish all edges with a zigzag stitch, then sew up sides and bottom, box corners as above, hem the top by folding over twice and stitching. Cut webbing for straps and stitch to bag (66cm seems a good length to me, but pin the straps to the bag before cutting, to test).

A storage bin is even simpler. It's a purse without a zip: sew the lining pieces to the outer pieces along the top edge, and then proceed as for the purse above.


Thursday, 7 May 2015

Basics: How to Make Pointy Corners


I know of two ways to make pointy corners on cushion covers.

For the first one (on the left), cut away the excess fabric between the seam stitches, being careful not to cut through the seams themselves. While this works 90% of the time, there is an element of lucky folding involved when the corner is turned right side out, and the cutting needs to be done carefully.

For the second one (on the right), sew one seam, in this case the vertical one. Then fold the fabric along that seam, and sew the horizontal seam. When the corner is turned right side out, the excess fabric lies flat. No cutting needed.

For cushion covers, I usually sew the two side seams first, then the top and bottom.

Tuesday, 5 May 2015

Basics: Sewing Easy Cushion Covers

At my printing workshop I gave everyone templates for some basic items to print and sew up at home. The sketchy instructions I gave along with the templates need some fleshing out, so here goes:

To make a simple zippered cushion cover, you'll need a front piece and 2 back pieces; the back pieces are half the size of the front piece, plus a little bit extra to accommodate the zip seam. About 1cm should be sufficient. 

Zigzag stitch around all the pieces, then attach the zip. Right side of zip to right side of one back piece, stitch along the red dotted line.... then flip it over and attach the other edge of the zip to the other back piece (right sides together). 
 Important note: these drawings do not show the work exactly as it will look when you're making it; rather I'm trying to show the process. So in the step above, match up the side edges of the back pieces with each other.

Lay the front piece down right side up, open the complete back piece out flat, wrong side up, and lay it on top of the front piece. Open the zipper a few centimetres, and pin the whole lot together.
Stitch along the dotted red lines. Slow down as you get to the zip, and stitch really really slowly right over it. Trim the ends of the zip, and turn right side out. 

An envelope cushion cover is even simpler. 

Again, you'll need a front piece and 2 back pieces. This time, add a bit more length to the back pieces before cutting out: half the length of the front piece, plus 2cm for hem allowance, plus 5 to 10cm for the envelope overlap. 


Zigzag around all the pieces. Then hem the back pieces: fold down 1cm of fabric to the wrong side, fold it down again, and stitch along the red dotted line. (Ironing the creases before sewing makes things a bit easier.)
Lay the front piece down right side up, lay the back pieces down right sides down and overlapping, matching the edges carefully, and pin the whole lot together. Stitch along the dotted red lines, then turn right side out. 


Monday, 28 July 2014

DIY Noticeboard


An old picture frame, a piece of pegboard picked up on the side of the road, some paint, thin black elastic, and an hour or so of threading and re-threading. Neat and tidy.

I used 2 types of elastic: narrow flat elastic and shirring elastic, because that's what I had. I might do another layer going in the opposite direction, too. If you have enough elastic, some sort of intricate cross-stitch design would look nice.

Wednesday, 28 May 2014

Really cheap, really easy, really good


Calcium liniment is a surprisingly good, non-sticky moisturiser. Actually - it's an awesome moisturiser!

I first read about it on Garance Dore where Norma Kamali described it as a 'very ordinary liniment'. Which must mean, to me at least, that you can make it. More research revealed that it's used by French mothers to clean their babies' bottoms, and that it's available at any French pharmacy (and there are so many of those... every street corner, it seems). That suggested that it should be cheap. I mean, babies' bottoms! They must go through litres of it.

And then I found a recipe: 50% olive oil and 50% limewater. But I couldn't find limewater anywhere.

Again, the internet. Limewater is a saturated solution of calcium hydroxide, also known as slaked lime. And that you can buy at any South African pharmacy (of which there are not so many, sadly).

So, the recipe:

Add 1 teaspoon of slaked lime to 1 litre of distilled water. Shake it up and leave it overnight, then pour off the limewater without disturbing the excess lime that will have collected at the bottom. Fill a smaller, clean bottle halfway with the limewater, then top it up with olive oil, close it, and shake vigorously.

And there you go, calcium liniment. Use it on damp skin for best results. Shake before use if it separates (which is why I suggest a small bottle that won't go flying out of your hands and smash on the bathroom floor).

Thursday, 8 March 2012

Curing Fabric Prints


Since a few people have asked me recently about curing prints on fabric, I thought I'd put what I know down here, in case anyone else wants to know.

First off: 'curing' prints means making them permanent, so that the fabric can be washed. If prints aren't properly cured, they'll eventually wash out. (Unless of course you spill ink on your best skirt by accident - accidental ink never washes out, I don't know why.) Uncured prints will feel slimy after a short soak in water; that's the ink coming off.

The ink I use is water-based fabric ink/paint, also called silkscreen textile ink, to be used on plant fibre textiles, and it's cured by heat. Most manufacturers will put some sort of instructions on the container, and usually on their website too, so that's the best place to look for advice. But sometimes this info can be a bit sketchy.

Choose the fabric you'll use carefully. Synthetics are unpredictable at the high temperatures needed for curing; cotton, linen, hemp, or blends of these, are best.

Wash and dry the fabric before printing. It's possible to buy fabric that's prepared for print (PFP), but be wary. I've personally met whole bolts of fabric that swore they were print-ready, but turned out to be lying through their rotten little cotton teeth. Fabric straight from the shop often has sizing in it, which makes the fibres look smooth. When you print on it, you print on the sizing; when you wash the fabric, the sizing washes out, and with it the print. If you're at all unsure, test a small scrap of the fabric by rubbing ink onto it, curing it, and then washing.

The very simplest and surest way to cure prints is to find a local silkscreen company and pay them to do it for you, but that might not be practical.

Curing at home requires an iron or an oven, and a clock. Pretty simple, though not much fun in summer.

What you'll be doing is evaporating all the water in the ink, so that it can bond to the fabric. So the first point is to be sure that the print is quite dry. Overnight drying is a good idea, 2 or 3 days even better. Hang the prints up to dry, if possible; stacks of prints won't dry equally all the way through.

Curing by ironing is as simple (and as tedious) as it sounds. Set the iron to the highest setting, and start. Iron the print from the wrong side - I say this because that's what the websites say, not because that's what I always do - going over and over the printed part. You'll be stopping just short of scorching the fabric; touch it lightly with your fingers, and it should almost burn you. You should also see steam coming off the print. Most manufacturers recommend ironing prints for 3 to 6 minutes; audiobooks and Kindles come in really handy here.

For larger pieces of fabric, oven curing is easier. Set the oven to 180C, and let it heat up. Fold the fabric if necessary, wrap it in a sheet of tin foil, shiny side out, and pop it in the oven. Turn the oven off, and leave it for at least 15 minutes. When you take it out, open up the fabric and shake it out so that the steam can evaporate.

Very large pieces of fabric will need a few cures to ensure that the whole surface has heated up properly. In that case, don't turn the oven off, but keep a careful eye on the clock. 15 minutes should be fine, 10 minutes if you're nervous about the fabric burning. Take it out, shake it, fold it again so that the parts that were in the middle of the bundle are on the outside, wrap it in the foil, and cure again. Do this as many times as you feel safe to do.

Popping the bundle on a baking tray will make things easier, and wrapping the foil shiny side out is a good idea. (This is one of those things that I've been assured is a myth, but the one time I wrapped something shiny side in, the fabric ended up with scorch marks along all the folds, so I keep doing what I do.) Don't forget to use oven gloves.

One more thing: cold cure medium. This can be added to ink so that it will cure by itself, over time. This is what I use, but, ever the pessimist, I tested a few swatches and wasn't entirely happy with the result. So now I add cold-cure to my ink, and heat-cure with an Elnapress iron for 10 seconds. The combination works well (and yes, I'm very glad I got a Kindle for Xmas).

There are many, many things that can affect how well fabric cures, which is why ink manufacturers can seem cagey with their instructions. Even fabric that feels bone dry can have moisture in the fibres, which is why thinner fabrics will cure more easily than thick ones. Environmental humidity can affect things. Ink that's too old might not bond well. It's a bit like baking, really.

But you can develop a feel for it, and if you overcompensate a little, cure things for a little longer than seems really necessary, it should work out fine. If you're unsure of ink, fabric, or curing times, do a test swatch.

Anything I've forgotten?

Thursday, 9 June 2011

How to Eat a Pomegranate

(or: Bring Back the Diagram)

Video tutorials are great for lots of reasons, but instant comprehension isn't one of them. 

Thinking there had to a simple way to peel a pomegranate, I  looked online. Fully half an hour and several YouTube videos later, I had an answer. First, however, I'd had to watch a few minutes of each tutorial to find out whether they were showing the underwater peeling method, which I didn't want. Then I had to sit through what felt like hours of people showing and pointing at all sides of a pomegranate, all sides of the knife they were going to use, both sides of their cutting boards....

It's interesting to know that their grandmothers taught them this method. It's equally interesting to see their kitchens, their hairstyles, the funny way they keep moving their hands while they talk. But that's not the information I'm looking for.

One page, one drawing, that's all it needed. So here it is.

(For a further demonstration of the superior power of diagrams, compare just about any knitting video tutorial to any post on TECHknitting. There's just no contest.)

Monday, 9 May 2011

Bead Bracelet


I was clearing out my studio the other day and found this knitted bracelet from ages ago.

Very simple to make, and a good way to use up a stash of beads (it uses so little yarn that it hardly counts as a knitting stashbuster.)


It's knitted in the round, in stocking stitch, which makes it curl the way it does. The beads sit between the stitches on the purl side. Between two bights. (Yep, I didn't know that either until a few moments ago.)


You'll need:

some yarn (I used DK cotton)
some beads*
a circular needle or double-pointed needles to knit in the round (I used a 3mm needle, I think).

Thread the beads on to the yarn, cast on enough stitches to go over your hand easily, join to knit in the round, and knit 1 round.

Bead round: knit 1, slide a bead up to the needles, knit the next stitch. The bead should sit between the 2 stitches at the back of the work. Do this for the rest of the round.

Next round: knit.

Alternate beaded and unbeaded rounds, ending with an unbeaded round. Cast off.

*How many? Let's see.... 35 beads to a row... 3 rows of beads.... 105 beads! Which means I cast on 36 stitches.

Wednesday, 23 February 2011

Monday, 3 January 2011

Seven-panel skirt

Fabric: Daisy Janie's Geo Grand Crystal Ball.
Pattern: make your own!

What better way to start the new year than with a tutorial? And an easy one, too.

This pattern is based on the traditional shweshwe panel skirt: shweshwe fabric is often sold as pre-printed panels, and you buy as many as you need to make a skirt or dress. What I love about this method is that it's minutely adjustable to your perfect fit.

I found that 7 panels made a good skirt for someone who measures 'medium-medium-medium'; if you add more, you'll have a more flared skirt. And presumably if you're really really thin, you might be able to get away with 6.

This is the size of the usual panel, measured without seam or hem allowances. Draw it up as is to get the shape of the panel correct. Measure your hips at the widest part, divide by 7 (or the number of panels), and mark where the panel is that width.

Work out roughly the length you'll want above and below the hip line. 73cm makes a calf-length skirt on me; my final pattern was 58cm long - but I'm quite short. Add seam allowances, and hem allowances at top and bottom. (I added 1cm at the top and 4cm at the bottom.)

Cut 7 pieces; cut notches to mark the hip line.

Sew all the pieces together, leaving a gap at the back for the zip. (Oh, yes ... sorry, you'll need a zip.) Try it on, and adjust the waist fit. Leaving the front 2 seams fairly flat, take in the other seams all round. You might need to take in more at the sides than the back, or the same amount on all the seams; however you adjust, make sure that the adjustments are symmetrical. The zip seam can be taken in, but try not to end up with too much of a curve there - rather spread the adjustment to the adjacent seams.

Sew the adjustments from waist to hip line, smoothing the angle to a curve.


Try it on again, insert zip, turn over hem at the top, and hem the bottom.

Monday, 29 November 2010

Mes Petites Mains

Photo from Mes Petite Mains

Mes Petite Mains is a gorgeous online magazine full of craft and decor ideas for children, with things to make for little people and things to make with them. The knitting patterns are particularly tempting - they're mostly in French, but there's nothing a bit of common sense and some google translation can't solve.

Find the first issue here, and the second here. (I'm very pleased that my Oilcloth Basket tutorial is in the second issue, and looking so much spiffier than my version.)

Friday, 26 November 2010

String Thing


String and a 3.5mm crochet hook.

I used to have a black felt hat that was this sort of shape, and I've wanted a summer one for ages. A hat that really will keep the sun off your face.

Here's the basic shape:

Making this hat mostly means lots of fitting it on, ripping out what you spent the last half an hour doing, and trying again. (Not much different from most needlework, really.)

Use whatever size hook will produce a solid fabric; this shouldn't be a floppy hat.

Start with a chain and join it to make a circle. I used 6 chain stitches to start - you might need a different amount, depending on yarn and gauge, but you'll only know when you've done a bit.

Double-crochet into each stitch twice (single crochet if you're in the USA). You could do this in rounds, and contend with the maddening spiral seam that this produces, or you could just work in a spiral, ignoring the beginning of the round - that's what I did. Works fine.

Now work 2 dc in 1 st, 1 dc in next, 2dc in next, 1 dc in next etc all round (sc's obviously for the USA). And then 2dc in 1 st, 2 dc in each of next 2 sts, 2 dc in next.... and so on. Increase the number of single stitches between increase stitches on every round till the disc seems to be wide enough for the top of your head.

Check that the disc is more or less flat - this is where you might need to rip it all out and use more or less increases. I had a 6-pointed disc, but you might need 5 or 4 or 8.

When the disc is big enough, stop increasing and work straight until you reach the point where a brim would be a good idea.

Start working increase rounds again, lining the increases up more or less with the increases on the crown (just so they're evenly spaced; it doesn't have to be perfect). Check that it's as flat as you want; you might have to add a few extra increases in, or work a few straight rounds between increase rounds to get the right shape. Work until the brim seems wide enough.

Stop increasing, and work straight for a bit. Fit the hat on and check that you can still see without craning your neck. End off.


If you live somewhere windy, it might be a good idea to add a chain of crochet to keep your hat on. Or at least keep it from being blown away.

Friday, 22 October 2010

Oilcloth baskets


Fabric sample books are great for small projects, and if you can find one with plastic-coated fabric, so much the better. This could be the quickest sewing project ever: oilcloth doesn't need hemming.

The swatches from the book were already all the same size, with pinked edges. I cut out squares from each rectangle, more or less like this...


... and sewed up the seams and the corners like this:


Done in about 15 minutes!

(Use a thick needle, like a denim needle, and set a long stitch length.)

Thursday, 15 April 2010

Fabric Folder Tutorial

A while ago I promised a tutorial for portfolio cases. As I was writing it up, I found (via Craft Gossip) a beautifully put-together tutorial for a much more professional portfolio case. My first thought was "No! I'm doing that!" I still wanted to put mine up, but didn't want to seem to be copying. I mailed Kimberly of Niesz Vintage, and she agreed that great minds think alike.

All of which allows me to link neatly to this great post about originality, copying, and influences. Read it and read all the comments too - really interesting.

And here goes with my tutorial:

Cut 3 pieces of fabric: an outer, a lining, and a piece for an inner pocket. For an A5 folder, cut an outer 46cm x 17cm, a lining 22cm x 17cm, and a pocket 17cm high x whatever you have. For an A4 sketchbook folder, cut an outer 117cm x 23cm, a lining 62cm x 23cm, and a pocket 23cm high. (Seam allowances of 1cm are included in these measurements.)

Hem the short ends of the outer and the lining, and the side of the pocket that will be open, by turning under 1cm and stitching.

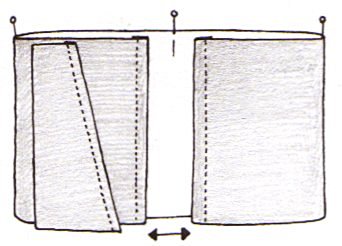
Mark the middle of the outer piece, and fold the ends towards the middle, with the right side of the fabric on the outside.


Leave a gap between the hemmed ends - 2cm for the A5 folder, 10cm for the A4 sketchbook. Mark the folds. Decide how close to the fold the pocket will be; flip the pocket piece so the wrong side faces you, and stitch it to the cover.

Flip it back over, and press the seam. Sew a button on the outside of the cover.
Fold the long piece again so that the right side of the fabric faces in. Place the lining piece on top, and stitch along the top and bottom.
Clip the corners.
Turn everything right side out (turn so the top and bottom seams are hidden, then turn the pockets, using a knitting needle to get the corners turned completely). Cut bits of card for the pockets and slip them in.

Tie one end of a piece of ribbon or cord around the button, close the folder, wrap the ribbon round to measure how long it needs to be, and cut. The ribbon should wrap 2 or 3 times round the button to be secure.


The sketchbook pocket.

Finished folders.