Thursday, 25 June 2009

Quick break from the break...


A peek at a new lino print I'm working on for an order.

Thanks so much to Kim Gray for featuring the pencil cases I did for Urban Degree today! (This lino above is related to that ....)

And while you're checking out Kim's blog, be sure to have a look at the shoot she styled for O Magazine, using some of my prints among others. See who else's work you can spot in the gorgeous photos!

Friday, 19 June 2009

Break


Need to take a blog break for a little while: all my part-time bits of work have suddenly decided to go full-time, at the same time. It's fabulous, but I wish there was a queuing system!

I'll see you on the other side of this mountain of work. (I'm sure I'll be twittering through it, though).

(Don't forget the craft meeting on Saturday, and the cd launch on Sunday - busy weekend!)

Thursday, 18 June 2009

The best beret


It matches my dog! It's Urchin, by Ysolda, and it's quick and easy and interesting to knit and holds its shape beautifully. Some more pics, to show the shaping:


It's also a great example of why Ravelry's the best invention since circular needles. The wool was a present, but I only had one skein; I searched high and low for another in the same dyelot, because all the slouchy beret patterns I had used more than one, but no luck. Then I searched on Ravelry for a one-skein beret pattern, and this popped up. I made it with 10cm to spare, leaving out the last wedge in the pattern.

Wednesday, 17 June 2009

Monday, 15 June 2009

Patterns


A few more transfer brooches; inching towards a batch big enough for firing.

Friday, 12 June 2009

Now that's what I call knitting!


You know when you learn a new technique and you just don't want to do anything else? That's how it is with twisted stitches - can't keep my hands off them. Travelling stitches learned for this pattern (free pattern on Ravelry here), Lisa R Myers' Travelling Stitch Legwarmers.

Lumpiness due to preknitted wool and no blocking yet - I hope.

Wednesday, 10 June 2009

Fragments


Some more bits of pottery I've found on my walks. Look at that ship one, isn't it amazing? I love seeing the different styles and marks and textures next to each other. It still astounds me, too, that I don't find matching bits.

Thinking about fragments, and discussing a fragmented online persona (not my words) this morning, and wondering what the need for it is. Some advice is that it's better to have different 'departments' for different work, and go under a different name for each. To have clearly differentiated brands. To not mix up art and commercial work. To not have people see instantly that you work for ad agencies as well as doing fine art.

My feeling is that it's better (and easier to manage) to have everything in one pot. It's all online anyway, so people will make connections. But I'm not very in touch with things, so I really don't know what's best. Is it confusing to know that one person does comics and illustrations and textile designs and fine art prints? And that some illustrations are for cool publications and some illustrations are for school books? Does it make that person seem a worse comic artist if you find out that they spend a good part of their time designing knitted dolls?

Is your work diluted by appearing varied, or does it all somehow come together and seem stronger?

Tuesday, 9 June 2009

Colourways


Knee-deep in transfers today, which is a pretty good place to be!

Monday, 8 June 2009

Good advice


Read this post by potter Whitney Smith, and feel instantly calmer and more collected. It's not easy, but it is simple.

Friday, 5 June 2009

At last!


Very exciting news! The people who play loud music in my house (and bring biscuits and cake, so it's fine, really) have recorded an album, and it'll be launched on the 21st of June. You can read all about it here, and listen to some tracks from it too.

Thursday, 4 June 2009

Handles - now with bags


A tiny little splash of daylight (not even sun, just light) at mid-day today: I rushed around with chairs, camera and wobbly tripod to snatch these shots of my new bags. It's been months now that I've been fiddling around with possible designs, yet these are pretty much the same as the knitted bags I made a long time ago!


I still need to work out some things, like an inside pocket, and possibly elastic inserted in the casing to hold the gathers a little more tightly, but I'm happy with the general shape and function. And the possibilities!

Tuesday, 2 June 2009

Better notebook covers


Although I was happy with the solution I've been using for cardboard inserts for my notebook covers, it kept bothering me that they didn't quite look or feel like a hardcover book. And the scoring and folding took just a little too long. So here's the new improved version: 3 separate pieces of card, with a strip of cloth tape glued on to hinge them together.


(I should have some of these in the shop by next week; today is one of those days when everything has to be done 3 times to get it right, which is slooow going...)

Monday, 1 June 2009

O list

Some of my printed buttons in O magazine this month, thanks to Kim Gray!

Friday, 29 May 2009

My mess

Rising to the challenge (or is it the bait?) of Francesca's post about messy homes and unstylish parts of them, I present the central bit of my studio. Look! The boots I wore 2 days ago! The hat I wore last week, I think? The notebooks that arrived a week before that! The dress I'm fixing, the bag I'm working on, the last book I read - and part of the mutoscope. And behind the chair, the trunk that catches the fallout from my desk (just keep shifting things out the way, till they fall off...) I thought it would be lovely to have a comfy chair in my studio, to sit in while I sip tea and ponder new ideas. And it would be.

While I'm on the honesty ride, here's another unappealing bit: the window that leaks and can only be fixed next week, maybe. So for now a towel will have to do.

This is a hopefully a bit of a 'Before' shot, because from next month this will be my studio window. I'll be able to sit and work in the sun - at my desk! I feel warmer already.

Tuesday, 26 May 2009

Quilting


Emile needed a new blanket. His old blanket was a grey matted affair, one of those dog blankets that's not much more than a felted mass of textile waste; hard to wash, and starting to develop holes. They're cheap enough, but I saw a chance to learn how to do the rocking stitch that proper quilters use. (I have a blogger quilt to make soon, remember?)

The stitch is both easier and more difficult than it looks, but really quite quick and not hard on the hands once you get going.


What do you mean, 'bedbeard'?

Monday, 25 May 2009

New doll


A new version of the paper doll. I like this one a lot more: she looks nervous and confused, and just a tiny bit annoyed. The dress will still fit her, as she's based on the previous dolls. (You can get the bigger version of the doll here.)

Friday, 22 May 2009

Handles

Back when I first started selling on Etsy, knitted bags were my thing. Frustrated (actually, appalled) at the cost of commercially available handles, I came up with my own version.

One of the nice things about these is that they can be matched to the colour of the bag. Another nice thing is that they can be removed easily if you want to wash the bag. Which makes them perfect for the printed cloth bags I'll be making soon!

Here's how they're constructed:

You'll need a sharp knife, and a leather hole punch or a hand drill - or something, at least, that can make a decent hole.

Materials:
plastic tubing, about 2mm thick. It's available from hardware stores, and I think it's used for water features and fish tanks. Take care that it's not too thin, or the handles will be floppy, and not too thick, as the plastic can look blue. My handles are 57cm long, so 1.2m should be enough.
2 small cable ties
A length of ribbon or a crocheted chain for each handle.
A bag that needs handles. (These handles are for bags that have a casing around the top edge.)

Cut the tubing into 2 equal lengths (57cm long). Trim the ends, cutting them so that they'll meet each other cleanly, not at an angle.


Make a hole, either with a leather punch or a drill, about 1cm from each end, going through both sides of the tube.

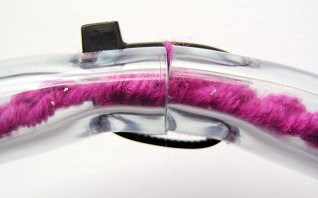
Thread the ribbon or crocheted chain through the tubing. The easiest way to do this is to thread a length of thin wire through, bend the end to make a narrow hook, and pull the ribbon/chain back through.

Feed the tube through the casing of the bag.

Stick a cable tie through the hole in the tubing, through the crochet chain (or past the ribbon), and out the other side. Don't pull it all the way through. Leave the stopper sticking out far enough that it will be able to reach the other hole.


Holding the cut ends of the tube flush with each other, stick the cable tie through the other set of holes. Pull the ribbon/chain tight, knot the ends together, and trim. Try not to cut them so short that they'll be hard to undo. Feed the ends back into the tube.

Push the end of the cable tie through its stopper, and pull it as tight as possible. (Use pliers, not your teeth....) Trim the cable tie.


To remove the handles, just cut the cable tie.

Wednesday, 20 May 2009

It's a repeat!


It's a repeat in more ways than one. The pattern originally comes from this print, and I reworked it to make it repeat. The whole cutting up the drawing and sticking it together again thing works, and is pretty fascinating to do.